
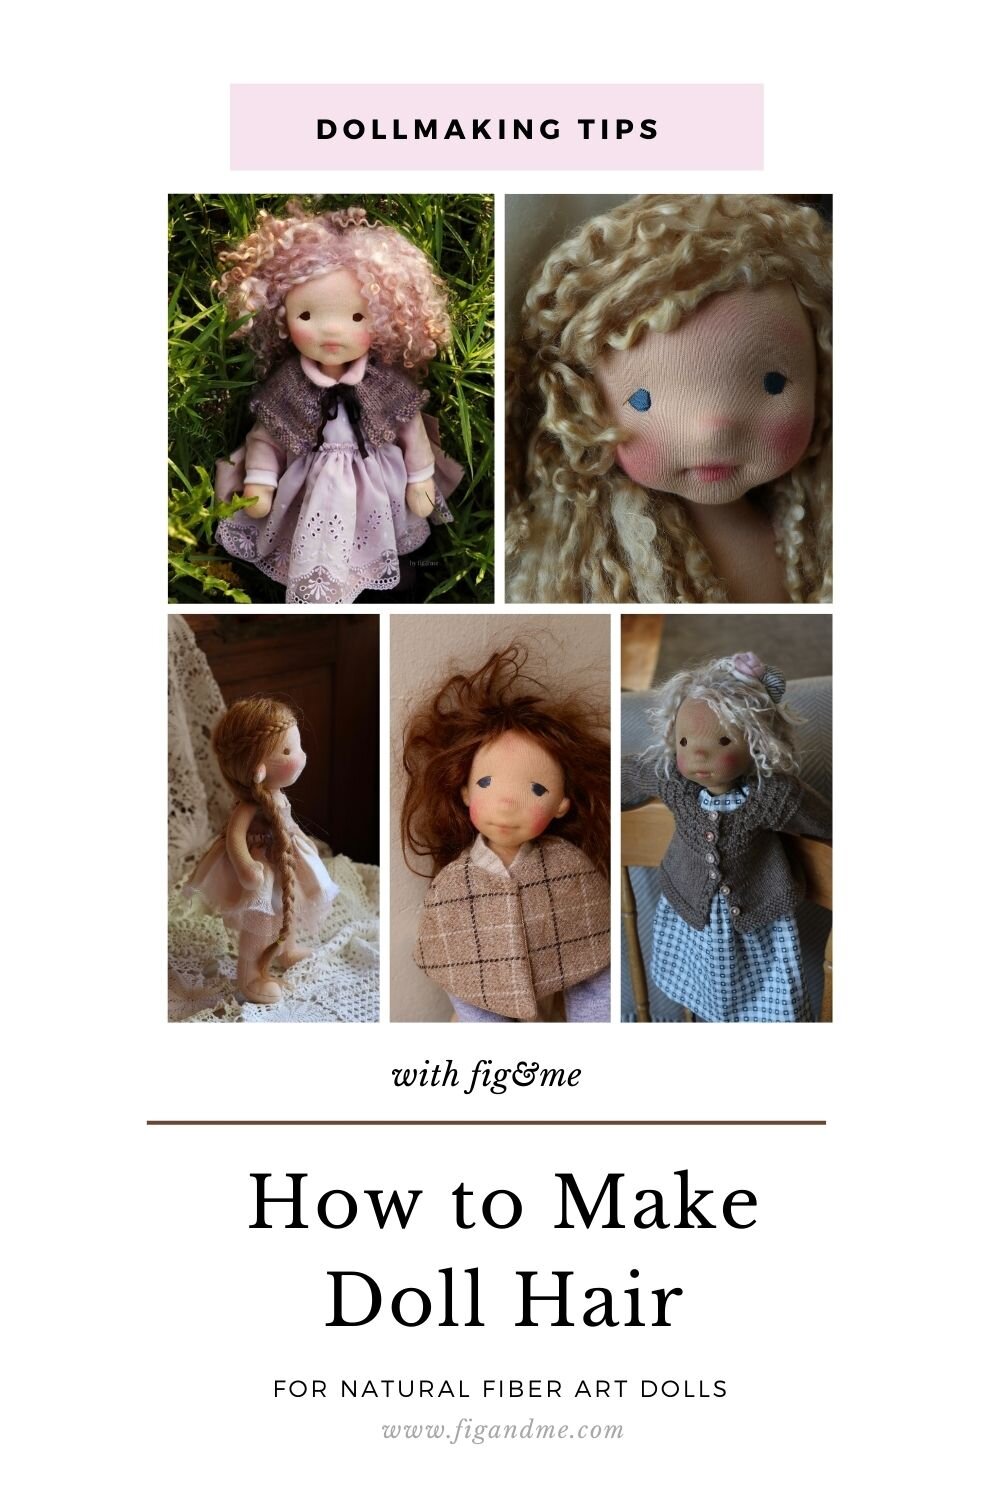
Dollmaking tips, how to make doll hair
Once you make your doll the question arises: what to do for hair?
The methods and variety of hair styles are endless but I will try to give you an overview of the most popular and widely used styles of doll hair for natural fiber art dolls or ‘Waldorf inspired dolls’ in the hope that this can point you in the right direction when you are creating a handmade natural doll.
First, let me warn you that I will mainly be talking about using natural fibers for creating doll hair.
You are free to use any other materials that inspire you or guide you when creating your doll, however I always strive to create my dolls with natural materials because I have an affinity for them, as well as I believe them to be a more sustainable way to create.
Natural materials for doll hair behave so much better and they will give your doll a nicer appearance, so I will always recommend them best.
But before you go considering what source of fiber or hair style to adopt, there are several considerations to take in mind.
If you want to quickly see my 3 favourite styles for doll hair, please check out that video in my YouTube channel.
1. Is the doll you are creating a toy for a child?
What is their age and what kind of doll play does he or she engages in? I consider small children under 7 years of age, and I would only recommend yarn hair for their doll, whether string-attached via loops or knots, or my favourite: a crocheted mohair wig.
2. Age appropriateness
If your doll is not for a small child, let's consider an age appropriateness of 7+, then I feel you have a bit more leeway in regards to style and most importantly: length.
3. Art dolls
If the doll you are creating is an art doll, then of course your creativity and use of materials can soar, but I always feel there needs to be a practical aspect to the creation of your doll.
While there are art dolls created as an "object" to be admired and appreciated, the dolls we are talking about here are dolls that can be and will be manipulated by their owners. Their hair played with, styled, and possibly washed. So you have to consider the tear and wear that the hair style or fiber will incur during its lifetime.
Once you have roughly decided the end-recipient for your doll, then you can consider the hair style that most suits their personality. And here let me stress this point: the age/personality of your doll.
If for example, you are using a doll body pattern for a baby (with lots of curved limbs) and you sculpt the face with “young child” proportions (chubby cheeks, quite round, etc), the doll would look very odd if you give it long hair.
So think not only of the end recipient for the doll but of the personality and character of your doll, so that you can choose a style that is both practical and that enhances your doll.
As I mentioned before, there are so many ways to make doll hair for natural dolls so I will speak now of the different methods I have seen used by other doll makers, or have personally used myself, when creating handmade dolls made of natural materials.
1. Brushed Mohair Wig
When you choose to work with mohair, there are two considerations: whether to use the long-staple mohair that creates the fluffy cap or use the bouclé mohair that gives you a more curly look.
For my review of DollyMo and Wild Brushable yarns, and the different ways you can use it, please head over here: Mohair Yarns for Dollmaking.
For the fluffy cap, you will basically make a cap or hat that will fit your doll quite snuggly. You can either crochet it or knit it.
I personally crochet the caps, but my dear friend Jenny Marshall at Little Jenny Wren dolls, knits them with the same results. Then you brush it with a wire comb/wool teaser/pet brush in order to lift more of the mohair fibers from the nylon binding, which in turn creates the hairy halo. This will be ‘method one’.
Another more time-consuming method is to crochet/knit each stitch and pull as much of the mohair fiber to the other side of your cap as you go along. You don't have to brush it with a wire comb (if that freaks you out), and in my humble opinion this method creates the fluffier wigs ever.
It does take forever but the result is so worth it. That's why I included the instructions on how to make this hair-style as the hair option in my Little Fig doll pattern. You can find that pattern in my store.
This is such a beautiful and understated way of adding hair to your doll. It is both playful and practical, as with time the doll's hair will mat but you can tease it again and revive the cap quite easily. It is the hairstyle I chose for my precious doll Poet.
A NOTE here: Please remember that the fact that the doll ages in appearance as time goes by is one of the most wonderful aspects of creating this style of dolls. The doll is not static, frozen in time as with a plastic doll, it takes life experience and ages along with your child or with you.
For suitable mohair yarn, please abstain from using mohair meant for knitting. The staple is just not long enough to cover the doll's head properly, so stick to mohair yarn specifically created for doll making.
I strongly recommend Wild Brushable and/or Dolly Mo as these yarns were designed and created by doll makers themselves. Not only do the yarns have the longest staple I've seen, but the hair colours they provide are beautiful and very grounding.
You can check out this video on How to Crochet a Doll Wig using doll making Mohair yarn.
2. Yarn cap with added strands
Another very playful method, as well as easy both to maintain and create, is to crochet or knit a cap for your doll and then add strands of yarn to this cap.
You can use the same yarn as the cap, to minimize shock value but you can also get very creative and not only vary the colour of the yarns used but the type and fibre. Think of adding different shades of the same colour, more textures or even funky yarns if you are making a mermaid for example.
Confession time: this is the style that most attracted me when I started creating dolls and I used to love using all kinds of handspun yarn to add more texture to the doll's hair. I have to say, this is also the easiest to create so it has the shortest entry barrier when you start creating doll hair.
There are a few different ways to do this: you can attach the strands by knotting them or looping them to the cap (which you have previously sewn down to the head of your doll) or if you are using thin yarns, you can attach them with a blunt thick needle and create loops or knots as you go.
For a simple tutorial to understand the ‘basics’ of the method, please visit Meg at Mama Liberated and her tutorial on the Little Amigo doll. Meg didn't even crochet the cap, she braided the yarn to create a sturdy base, then she sews these braids down on the doll head and then attached the long strands of wool yarn to the braided cap.
You can also grasp the general idea by checking out Beth's old Flickr tutorial. Once you understand the procedure, try experimenting with a variety of yarns to create texture and more life and movement hair-wise for your doll.
3. Yarn strands sewn-down
Another very simple method used when you want to utilize yarn for hair, but this time using your sewing machine, is to make bundles of yarn sewn down the middle and then attach them to the doll’s head. The general procedure goes something like this:
cut the yarn double the length you want for your doll’s total hair length.
measure on the doll from where you want the hairline to start (at the forehead) to the back of the head, and that will be the length of the line you will sew with your sewing machine.
arrange a bundle of cut yarn over a piece of paper, cut to the length you previously measured. Make sure you have equal lengths of yarn to both sides of the paper strip because you will basically be sewing the middle part of your doll's hair.
sew the strands of yarn to the paper strip with your sewing machine.
sew these bundles to the doll head. Place the bundle of yarn right in the middle of the doll's head (middle part) and sew to the head over the stitches you made with your sewing machine. In order to secure the strands to the sides, you can sew them down around the head in a circular fashion, creating the hairline.
Repeat this process until you have the desired thickness you want.
This method gives you the same accessibility as the previous one, meaning you can get very creative in regards to the colours you use on your doll's hair and which yarns to use with the added bonus that is also very playful.
This is the type of hair that you will find commonly used on most commercially produced dolls: yarn hair sewn-down in strips.
For a tutorial that explains the basics of how to do this please visit Making a Picolina by Bamboletta Dolls.
4. Tibetan lambskin, or TLS
This style was quite popular a few years ago and is still a very suitable type of hair for your doll.
Tibetan lambskin means that what you are basically using is the hide of the animal with the "fur" or fibre still attached. There are different varieties of this hide/fur available but mostly you will find that it is either Kidassia goat (which has very straight hair) or Tibetan Lambskin (which looks a bit curly at the ends).
The process to use this material and turn it into doll hair is simple enough:
cut pattern pieces to make a hat (think of the pieces of a simple bonnet, one for the main centre that goes from the forehead to the nape of the neck, and two crescent moon shapes for the sides-the fewer seams the better).
I recommend sewing one ‘trial hat’ with muslin or woven fabric that doesn't have a lot of "give" so you can make sure that your pattern or template actually fits your doll’s head nicely and neatly, before you cut and sew the hide.
To cut hide, don't use scissors, use a sharp blade or an X-acto knife. Cutting only from the wrong side of the hide, to avoid or minimize the damage to the furry side of your hide.
Sew the pieces with your sewing machine, using a leather needle. Since you can't really pin the pattern pieces together, use small binder clips to hold the pieces in place as you sew them. Make sure there is as little fibre caught in the seam as possible.
Open the seam allowances once finished, so they lay down better once you place the cap on your doll.
To sew down the cap to your doll's head, first prepare the cap by shaving off a little bit of the underside along the circumference of the cap, the area where you will actually sew it to the doll’s head. This will diminish the amount of leather you will be hand-sewing to the head and therefore a bit easier on your hands.
Use a leather thimble or any other tool you feel comfortable with when you are sewing the cap to the doll's head, to protect your fingers.
Fold under a little bit of the cap, pin to the doll's head and sew with small ladder stitch or whip stitch. You can also use some pliers to pull the needle in and out if you find this procedure a bit difficult or your hands don’t have a lot of grasp strength.
Some things to consider: I am not entirely sure you can wash a doll with this type of hair, as I don't know how the hide will react with being entirely wet and the slow-drying process of the wool stuffing used in your doll. When we wash dolls with wool stuffing we want to encourage good air flow.
I would love to hear about a doll with Tibetan Lambskin that has been washed, so if that’s you and your doll please report back.
I have used this method/hairstyle in the past only once and my one complaint was that the doll I used it for was for my daughter and a chunk of it got stuck on her bed and the doll ended up with quite a bald spot. In the end, I had to replace the hair and I chose a more suitable material for a child to play with the second time around.
That’s why I encourage you to think beforehand of the intended end-recipient for your doll, so you can use a material that is not only appropriate but that will have the longest possible life.
For a tutorial on how to use this method of hair, please visit Antique Lilac.
5. Fabric cap: felted, cloth, mohair or wool felt
Even though I don't see this style used as often, it is one of my favourites.
Most "rag dolls" have some sort of fabric hair, wether is repurposed doilies, wool felt or even felted sweaters (like I use for my Cloth Figs in the photo above).
I think this method has so much potential and uniqueness and brings a different sort of vibe to the doll. I can't recommend it highly enough.
You can either sew a cap like previously mentioned for the Tibetan Lambskin, or you can get really creative and ‘drape’ the hair and create a permanent or semi-permanent hairstyle. You can sew ponytails, or buns or whatever you see fit. It is an extremely playful style and one suitable both for children and collectors.
You can also use Mohair or Alpaca fabric, which has the added bonus of already looking a bit "furry" so that your doll will have a bit more wisps of fibre. This fabric is quite expensive as is mostly used to create teddy bears, but doll heads are not very large so a little goes a long way.
6. Roving: sewn down or needle-felted
One style of hair that is not as widely used, at least not for children to play with, is using wool roving and sewing it down or needle-felting it to the doll's head.
I think it tends to pill very fast, but if the doll is geared towards a collector then it shouldn't be a problem. Most needle-felted table dolls have chunks of roving or locks styled into hair, and they fare rather well, so it really depends on the style of doll you are making.
I have seen it used when it has been needle-felted into the doll's head marking a middle line, and then the lose ends turned into pigtails or buns and is quite adorable.
Again, when it comes to your doll's hair you have to experiment and see what works for you and his/her personality, always taking in consideration who the doll is geared to.
Roving can be found on Etsy as well, as it is mostly used for needle-felting or wet felting.
You might be able to find some beautifully hand-dyed roving at your local yarn store as well.
7. Commercial weft: sewn down or crocheted into a cap
Now, a much easier way to create a very realistic hair style is to use commercially produced mohair weft.
Mohair weft is treated with God knows what, so it won't felt, and is available not just on mohair (goat) fibre but also on yak and camel.
The ‘wefts’ are long strips of locks or fibre, sewn (usually three or more times) together, with glue applied to the seams so the fibre doesn’t come off, which then you can either sew down onto a cap and/or directly to the doll's head, or turn into a wig with a crochet hook and matching yarn.
I like the last method the best, but I find it so bulky on the doll's head with the yarn and the weft together, so lately I have been sewing the weft down by hand.
I am able to manipulate the direction of the hair more accurately than crocheting in semi-concentric circles and therefore the hair falls down in a more natural way.
What I normally do is make a cap in crochet with wool yarn. I then sew this cap to the doll's head and hand-sew the weft to the cap.
This way I am not sewing directly to the head, which is very hard on your hands and you might still see chunks of ‘skin’ peeking through the wefts, which I personally dislike.
I don't like making felt caps, I like the feel of the crochet ones and I also use the stitches as guide sometimes of where to attach the weft.
You can also do the same method and attach it instead to a felt cap, using your sewing machine.
If you want to make a doll with this method for doll hair I have now published two doll patterns that teach you this hair technique as well: Big Fig Doll Pattern and Tuppence Doll with a Wired Neck.
What to look for?
When you are ready to try this method, the weight of the weft is not really important. You want to buy it by the total length.
It is usually listed by how long the actual weft is, its colour, the length of the fibre, what type (curly, straight, etc), and wether is coarse, medium or fine mohair, and then its total weight.
Since you will be sewing it down, what you need to know is its total length. I normally use about 120/140 inches long for a doll with a 13 inch head circumference (I am talking about the circumference of the actual hair line, not measuring around the eye line of the doll’s head).
If you would like to see how I sew the mohair weft to a wool mohair cap, you can check out my VIDEO TUTORIAL on my YouTube channel.
8. Wefted locks: sewn down or crocheted into a cap
Now, if you have understood the method to use weft, whether turning it into a cap with a crochet hook and yarn or sewing it down, whichever you decide, then most likely you will end up coming to the conclusion that you want to create a weft by yourself using your chosen fibre.
This is truly a world of wonder because you can select any kind of locks, turn them into a weft by sewing them into long strips, and then attach this to the doll via your preferred method.
Such an extremely natural hairstyle requires very considerate care and shouldn't be handled extensively. Because the fiber you are using is untreated, it will likely felt if handled extensively.
It really depends on the type of locks you use. I have used Teeswater, Wensleydale, Mohair and Suri Alpaca. The alpaca is my least favourite, and the Wensleydale locks my most favourite, but the dolls are always requesting Suri Alpaca, of course!
If you want to check out the way I turn Suri Alpaca locks into a weft, you can check out this YouTube video. If you want a more thorough step-by-step of the whole process, including how to clean the fiber, etc. check out this pattern: Sewing Wefts for Doll Hair.
For resources on animal fibre locks, I would highly recommend doing a search on Etsy by the type of fibre you are looking for, i.e. "Wensleydale locks" and you will be rewarded with tons of storefronts where fibre-folk share their wares with you.
Now, the question will arise, how much fibre to buy? Bear in mind that the longer the fibre, the more you will need, as you need to cover the doll’s head based on the total length of the weft you will be making.
I can give you a general guideline, based in my experience for a doll with a 13" head circumference, in locks about 8" to 10" long, I would buy about 6 to 8 ounces of fibre.
This is because combing and prepping the weft will have to happen and you always end up losing quite a bit in the process. Also, once you make the wefts and you brush them, some more will come off. I always try to buy a bit more than what I need.
I have made a very in-depth tutorial on how to use long Suri Alpaca locks to make them into a weft, which includes suppliers, how to prep the fibre, how to prep and wash the wefts once made and how to sew it down to the doll’s head, with step-by-step photos, as well as some guidelines on how to take care of the doll’s hair later on. You can find the How to Use Suri Alpaca for Doll Hair tutorial in my Etsy store.
9. Wool locks: attached to a cap or needle-felted
Now, if you don't want to create a weft, because of the size of your doll (too much bulk) or some other reason, but you still want to use locks, you can attach them to the doll in two main ways.
One is to loop and/or knot the locks into a crochet cap, the other is to needle-felt them into the doll's head.
Main concerns are of course the delicate nature of the locks and the fact that this is a style suitable only for collectable dolls and not for children’s toys.
One idea is that you can needle-felt a base of similar colour roving to the doll's head, and then needle-felt the locks to this woolly base. I think that would help to attach them more securely, than just having the locks attached to the wool with the skin cotton in between.
Also, the felted layer of roving will prevent further damage to the cotton skin fabric, as the felting needles will definitely break some of the threads, causing ‘runs’ and small holes into the knit fabric.
For this process you will need locks that are a decent length (like at least 4 to 6 inches long) so that you have plenty of material to work with when attaching them securely to your doll.
Word of caution: do not FOLD locks halfway and then attach them to the doll’s cap that way. Wool locks have tiny little hooks that all go down the same way, starting at the root. When you fold the locks, some of the hooks are going up and some are going down, which will cause them to felt just by mere play and handling. What at first looked like a beautiful and full head of hair will then end up looking like a matted mess with bald spots.
10. Embroidered hair
As the last style, I want to suggest to you the embroidered variety. It is not as common in my opinion, maybe because it takes considerate amounts of time and effort to create this hairstyle, but it is such an endearing one that more people ought to use it.
My dear friend Agnes at Lalinda does a marvellous job in this tutorial on her large and small dolls with this kind of hair, and I have seen it used extensively by Eastern European doll makers, so perhaps it is the technique of choice taught there.
11. Doll Wigs
All the styles and methods discussed so far are all styles you can make yourself with the actual materials and I feel they add a lot of clue into how your creativity works.
You can of course go the ‘purchased route’ and buy a pre-made wig and sew it down. This would save hours and hours of work and you could end up with an extremely nice result.
You can find mohair wigs and fake mohair wigs so pay attention to what you are actually buying. Some categories might say Mohair wig but upon closer inspection it reads synthetic mohair.
So there you have it, I think I have touched upon the most common methods to create hair style on dolls, and have mainly recommended using natural fibers for such purpose.
If you have a particular question please post it in the comments, or if you have a suggested hair style as well (so that I can expand this list).
I think this will give you enough food for thought, and maybe you like me are now itching to try a new hair style. Such is the life of the creative, you must always be trying new things, experimenting and gaining insight.
I wish you the best of luck creating hair for your lovely doll, or maybe even giving one of your dolls a makeover. There is a wonderful world of opportunity and choices for us out there, so let's be brave and try our hands at something new and fresh.
Let me know in the comments how you fare. And make sure you read them as over time people have added their particular way of using one of these techniques, for all of us to learn a tip or two together.
Thank you for reading this very long post, I hope it inspires your doll making.


